Buy your weekday smoothies and get your weekend ones for free. (7 for the price of 5!)
WELLNESSWEEK

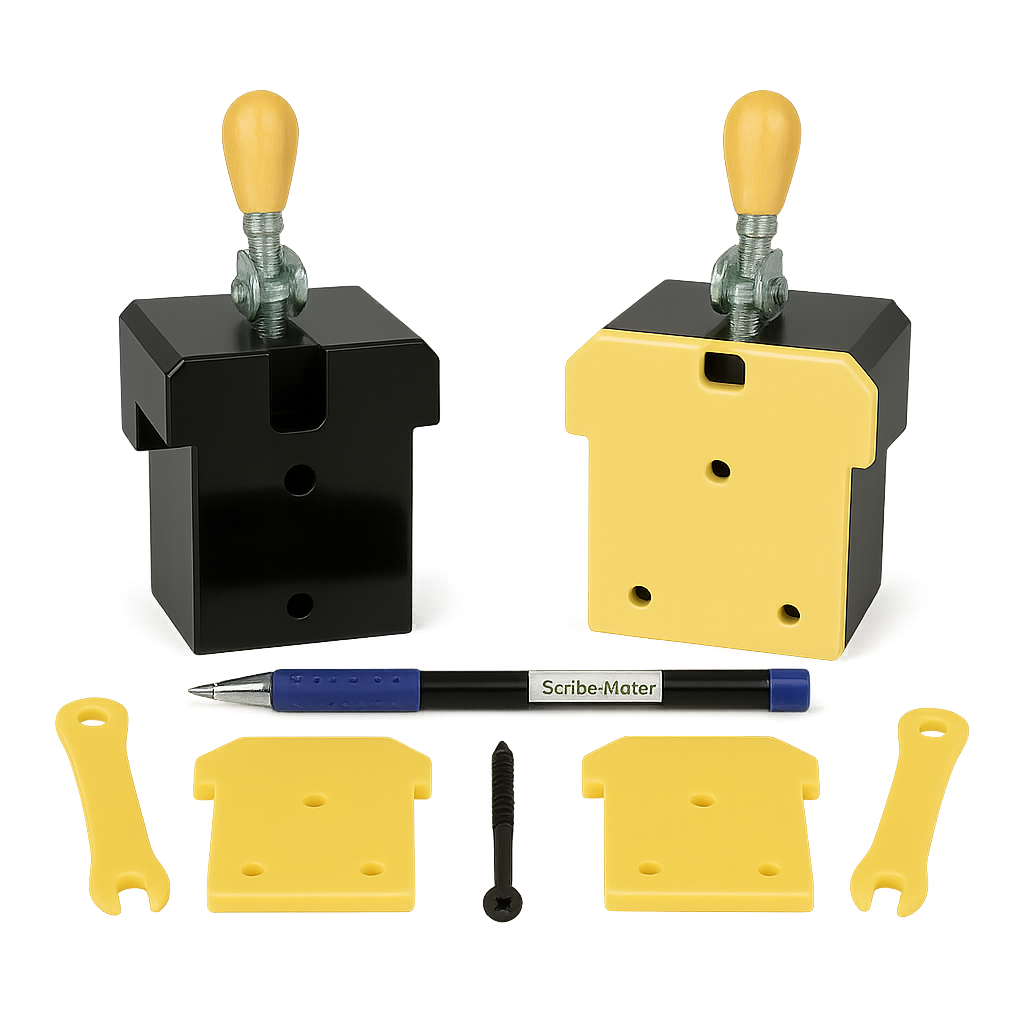
Scribing a cabinet panel so it sits flush against uneven walls or surfaces is one of those jobs that separates a tidy finish from a frustrating one. Traditionally, it can be fiddly, time-consuming, and easy to get wrong. But with the Scribe-Mate tool and a few clear techniques, achieving a professional scribe line on the first cut becomes a straightforward process.
Below, we’ll walk through the main methods and situations you’ll encounter—whether you’re dealing with pre-drilled hinge holes, corner placements, long plinths, or stepped cabinet panels.
Most cabinets arrive with standard hinge plate holes—commonly 5 mm or 3 mm in diameter. Scribe-Mate is designed to work seamlessly with both:
Insert the location pins into the correct holes (directly for 5 mm; with shims for 3 mm).
Fix the jig gently using the supplied bugle-head screws—firm enough to hold, but without overtightening.
Position your fillet so it sits snugly against the jig’s clean edge and secure with a clamp.
Glide the scribing tool smoothly along the surface and cut precisely to the marked line.
The result is a fillet that fits tightly with minimal need for caulking—a clean, professional outcome every time.
Not every cabinet is supplied with hinge holes, but there are two reliable workarounds:
Option A – Using the Cabinet Corner
Place a “shoulder” of the jig into the cabinet’s corner.
Secure it, clamp the fillet as usual, and scribe along the edge.
Option B – Using a Location Plate
Fix a location plate opposite the jig’s pins.
Secure the jig block in place, clamp the fillet, and mark your line.
Remember to remove the plate before attaching the fillet—otherwise, you’ll scribe 3 mm too narrow.
For plinths and top panels where corners are your reference points:
Insert the jig shoulder into the inside corner (top or bottom).
Place a second jig in the opposite corner and clamp your fillet.
For longer runs, introduce a third jig with a location plate to maintain stability.
This setup keeps your scribe line consistent across extended lengths, avoiding drift or misalignment.
Uneven panel depths are a common challenge, especially when cabinets sit slightly out of line. To handle this:
Measure the thickness of the step.
Insert equal shims between the jig and the panel on both sides.
Mark and cut your line as normal.
This ensures the fillet remains uniform, preventing the uneven cuts that can result from stepped cabinet faces.
The screw holes used to secure the jig double as fixing points for the fillets themselves.
In most cases, these screws will be hidden neatly under cabinet hinges.
Where they remain visible, simply fit the supplied screw caps for a polished, seamless look.
By combining Scribe-Mate’s clever design with the right method for the job at hand, you can cut down on wasted time, reduce errors, and deliver a flawless scribe line every time. Whether you’re fitting kitchens, wardrobes, or custom cabinetry, these techniques give you precision and consistency without the usual frustration.
Join our newsletter below and we will email you your discount code.